Stovetop Candied Walnuts: Glossy Crunch Without the Oven
Imagine a delightful culinary secret, one that delivers irresistible crunch and sweet sophistication without the fuss of lengthy baking or a parade of ingredients. That secret?
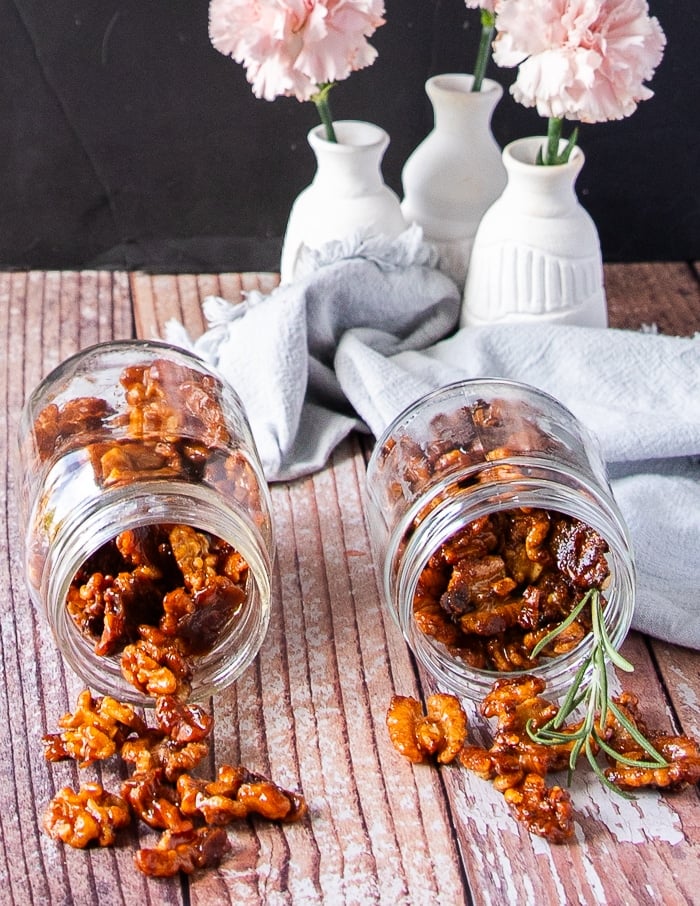
Easy candied walnuts, crafted right on your stovetop in mere minutes. Forget the oven's preheating and prolonged cooling times; this method offers a fast track to perfectly coated walnuts that boast a beautiful, glossy finish and a satisfying bite. Whether you're enhancing a vibrant salad, elevating a charcuterie board, or simply craving a sweet snack, these stovetop gems are a game-changer for speed, simplicity, and unparalleled flavor.
The Irresistible Allure of Stovetop Candied Walnuts
For years, the gold standard for candied nuts involved egg white coatings and a low, slow bake, promising that ultimate crunchy shell. While delicious, this traditional approach often demands time that many of us simply don't have. Enter the stovetop method: a revelation for busy home cooks and culinary enthusiasts alike. This technique redefines what it means to create truly
easy candied walnuts.
What makes the stovetop approach so compelling?
- Unmatched Speed: From start to finish, you're looking at about 10 minutes. This isn't an exaggeration; the process is incredibly quick, making it ideal for last-minute additions to meals or unexpected guests.
- Simplified Ingredients: Typically requiring only a handful of pantry staples – walnuts, sugars, a pinch of salt, and a few optional spices – this recipe minimizes complexity without sacrificing flavor.
- Dietary Friendliness: A significant advantage of the stovetop method is its inherent dairy-free and egg-free nature. This makes it a fantastic option for those with egg allergies or for anyone following a vegan diet, opening up a world of sweet, crunchy possibilities.
- Versatility Personified: These candied walnuts aren't just for snacking (though they excel at that!). They're phenomenal as a topping for salads, adding texture and sweetness to everything from a simple mixed greens salad to a more elaborate Brussels sprout or apple salad. They're also an elegant addition to yogurt parfaits, oatmeal, ice cream, or even as a standalone treat packaged in a jar for a thoughtful homemade gift.
While the texture might differ slightly from the airy, crystallized crunch of an egg-white-coated, oven-baked pecan, the stovetop version delivers its own unique charm: a rich, caramelized glaze that clings beautifully, offering a dense, satisfying crunch and a brilliant, glossy sheen. For a deeper dive into the quickest way to achieve this, explore our comprehensive guide:
Quick 10-Minute Stovetop Candied Walnuts: No Egg Recipe.
Crafting Your Glossy Crunch: Key Ingredients and Techniques
Achieving those perfect, glossy, and crunchy walnuts on the stovetop is surprisingly straightforward, but a few expert tips can elevate your results from good to absolutely sublime.
The Foundation: Ingredients that Matter
- Walnuts: Start with fresh, high-quality walnut halves or pieces. You want nuts that are plump and free from bitterness. While other nuts like pecans or almonds can be candied using this method, walnuts offer a distinct buttery flavor that pairs wonderfully with the sweet coating.
- Sugar Blend is Key: Don't underestimate the power of combining both brown sugar and granulated sugar. Brown sugar contributes those coveted deep, molasses-rich, caramel notes, while granulated sugar ensures a crisp exterior and helps achieve that desirable glossy finish without a flaky, crystallized layer. This harmonious blend is crucial for developing the complex flavor profile and texture.
- A Pinch of Salt: Often overlooked, salt is a flavor enhancer, not just a seasoning. It balances the sweetness, preventing the walnuts from tasting cloyingly sweet and instead creating a more nuanced, addictive flavor.
- Secret Ingredient – Citrus or Water: While water works perfectly fine to help melt the sugars and create the glaze, a touch of fresh orange juice and zest can transform your candied walnuts. It introduces a bright, subtle (or prominent, depending on how much you use) citrus kiss that cuts through the sweetness and adds an extra layer of gourmet flavor. If you prefer a more classic profile, simply use water.
- Warming Spices: Cinnamon is a classic choice, but don't stop there. A tiny pinch of cayenne pepper adds a delightful, unexpected warmth that creates a sweet and spicy dynamic. For deeper, aromatic notes, consider nutmeg, ginger, allspice, cardamom, or even a pre-mixed pumpkin pie spice blend, especially during the colder months.
The Process: Mastering the Stovetop Method
- Preparation is Paramount: Before you even light the burner, line a rimmed baking sheet with parchment paper. This step is non-negotiable! It prevents the sticky, caramelized walnuts from adhering to the pan and makes cleanup a breeze. Have it ready beside your stove.
- Choose Your Skillet Wisely: A heavy-bottomed skillet is your best friend here. Cast iron or a good quality stainless steel pan will distribute heat evenly, which is vital for preventing the sugar from scorching before it has a chance to properly melt and coat the nuts. A lighter pan can lead to hot spots and burnt sugar.
- Combine All At Once: A common misconception is to melt the sugar first, then add the nuts. However, for stovetop candied walnuts, the best and easiest approach is to combine the brown sugar, granulated sugar, salt, spices, liquid (orange juice or water), and the walnuts *all at once* in your skillet. Tossing them together ensures that the nuts are evenly coated from the start. This method also prevents the sugar mixture from crystalizing prematurely, which can happen if it cooks too long before the nuts are introduced.
- Constant Stirring is Key: Place your skillet over medium heat. This is where your active participation comes in. Stir constantly for about 3-4 minutes. You'll observe the sugars beginning to melt, forming a glossy coating around each walnut. The nuts will also begin to toast, enhancing their natural nutty flavor. The constant motion ensures even cooking and prevents burning. As the sugar melts and coats the walnuts, the mixture will bubble and thicken.
- Cooling for Crunch: Once the walnuts are fully coated and fragrant, immediately transfer them to your prepared parchment-lined baking sheet. Spread them out into a single layer, ensuring they aren't clumped together. This quick separation is crucial, as they will stick together as they cool. Allow them to cool completely, undisturbed, at room temperature. As they cool, the sugar coating will harden, transforming into that irresistible, glossy crunch you're after.
For a more in-depth exploration of the nuances of this technique, including how to achieve that perfect glossy finish, be sure to check out our detailed guide:
Master Easy Candied Walnuts: Stovetop Secrets for Glossy Crunch.
Beyond the Basics: Flavor Adventures & Serving Suggestions
The beauty of these
easy candied walnuts lies not just in their simplicity but also in their adaptability. Once you've mastered the basic technique, the possibilities for flavor variations and serving applications are endless.
Experiment with Flavor Profiles:
- Spicy Kick: As mentioned, a pinch of cayenne pepper is a fantastic addition, creating a tantalizing sweet-and-spicy contrast that wakes up the palate.
- Herbaceous Notes: For a savory-sweet combination, dried rosemary, thyme, or even a hint of sage can be surprisingly delicious, especially when pairing with cheese boards or roasted vegetables.
- Citrus Burst: Beyond orange, try lemon or lime zest for a different kind of bright acidity.
- Coffee Infusion: A tiny bit of instant espresso powder can add depth and a sophisticated mocha undertone to your candied walnuts.
- Smoked Paprika: For a unique, smoky sweetness, a very small amount of smoked paprika can create an unexpected twist.
Creative Serving Ideas:
- Salad Star: The quintessential use! They add texture, sweetness, and a gourmet touch to any green salad. Imagine them scattered over a spinach salad with goat cheese, cranberries, and a balsamic vinaigrette.
- Charcuterie & Cheese Boards: A must-have! The sweet crunch perfectly complements savory cheeses, cured meats, and fresh fruits, creating a delightful textural and flavor contrast.
- Breakfast & Brunch Boost: Sprinkle over oatmeal, yogurt parfaits, granola, or even pancakes and waffles for an elevated morning meal.
- Dessert Topper: They are divine over ice cream, custards, puddings, or as a crunchy element in fruit crumbles and crisps.
- Baking Ingredient: Chop them up and fold into muffin batter, cookie dough, or even quick bread recipes for an extra layer of flavor and texture.
- Homemade Gifts: Pack them in a decorative jar with a ribbon for a thoughtful, edible present that truly shows you care.
Troubleshooting & Storage for Perfect Results
Even with a recipe as simple as
easy candied walnuts, a few common questions or issues can arise.
Common Troubleshooting:
- Why are my walnuts sticky? This usually happens if they haven't been cooked quite long enough for the sugar to fully caramelize and harden, or if they were left in a clump to cool. Ensure constant stirring until the sugar looks glossy and thickened, and spread them quickly and thinly on parchment paper to cool.
- Why did my sugar burn? The heat might have been too high, or you stopped stirring. Maintain a consistent medium heat and keep those walnuts moving in the pan. A heavy skillet helps prevent hot spots.
- My walnuts are clumped together. You need to spread them out immediately after taking them off the heat, while the sugar is still pliable. If they cool in a large mass, they will harden into one solid block.
Storage Tips:
Store your cooled candied walnuts in an airtight container at room temperature. They will retain their crunch and flavor for up to 1-2 weeks. Avoid refrigerating them, as the moisture can make them soft and sticky. If they do lose a bit of their crispness over time, you can briefly reheat them in a dry skillet over low heat for a minute or two, stirring constantly, then let them cool again on parchment paper.
Embrace the Stovetop Advantage
The next time you're craving that delightful sweet crunch, remember the power of the stovetop. These
easy candied walnuts offer a quick, efficient, and incredibly satisfying way to add a touch of gourmet flair to any dish or occasion. They prove that you don't need fancy equipment or hours in the kitchen to create something truly delicious and impressive. So, gather your ingredients, embrace the sizzle of the pan, and prepare to delight your taste buds with perfectly glossy, wonderfully crunchy candied walnuts – made with ease, every single time.